Tech Bytes
Hi, this technical blog will contain urls/tutorials that relate to latest technology. More so, I will also attempt to write tutes on my own to simplify things that are too complex. Thanks for your time in checking out this blog.
Sunday, January 20, 2008
Moved to Wordpress
Do stay in touch :)
P.S: I posted this message long ago on my non-tech blog and completely forgot about posting it here.
Sunday, September 02, 2007
Import Blogger Blogs to Wordpress - Problem Resolved
This problem can be resolved only in custom wordpress installations i.e. you have your own domain on which you have installed wordpress (downloaded from http://www.wordpress.org/).
After login through FTP (Example FTP client is filezilla) to your web hosting provider, locate the folder where you have installed wordpress. In my case, I have installed it in a folder called "blog".
Locate the folder "wp-admin". Inside wp-admin, select a folder called "import". Open the "import" folder. There's a file called "blogger.php". Download the file to your computer. Open the file in any of the popular text editors and go to line number 87. It looks like the first screenshot.

[Click the image for a bigger screenshot]
Line number 87 is highlighted in blue. Change "www2.blogger.com" to "www.blogger.com" (Refer to screenshot below). Save the file and upload it to the same folder from where you downloaded it.

[Click the image for a bigger screenshot]
Have fun! :-)
Wednesday, August 15, 2007
Digg: Google's next acquisition?
1. All diggs/links are user generated.
2. Most relevant search results are relevant.
3. Since everything is user generated, digg has a wealth of information regarding user behaviour, browsing habits and a whole lot of other things. You can even call a "mini" google history of the guys who digg the posts.
4. It's an awesome complement for the existing search technologies.
5. Top diggs are comparable to the first page results of google search.
There are more, but I'm unable to think of them now.
May be it's a superb acquisition target for Google :-)
Sunday, March 18, 2007
Port Redirection for MT880 Routers
When I use the router as a gateway, I cannot give my system IP address to my friends to test any webpage because the router acts as a proxy. The only solution for this is port redirection. Port redirection means that a request on a particular system on a particular port will be redirected to another system on another port.
I had been trying in and out to configure the "Virtual Server" section to redirect to my system but in vain. Today, I found an excellent tutorial in one of the forum threads at vinuthomas.com, explaining the steps to achieve the same. I have downloaded the tutorial and uploaded it again on my server. Download it here and enjoy configuring your MT880 router to run your own web applications.
Thursday, February 08, 2007
sc.exe
On the way, I discovered a tool called "sc.exe". Deleting a service has never become easier that that command :D
1. Start->Run->cmd
2. sc delete service_name - where service_name is the service to be removed.
To find the service name,
1. Start->Run->services.msc
2. Find the service. The 1st column contains the service name. Use this in the sc command.
Read more about the sc.exe command.
Bye!
Sunday, September 17, 2006
How-To: Create a wordpress template in 5 minutes
A few things before you need a template are,
1. Figure out the layout of your blog. That is, you should be clear about what should be placed where. Ofcourse, it's entirely at your discretion.
2. Create a simple HTML page that show cases your layout.
3. Mould the simple page into a beautiful wordpress template.
Ready?? Ok, let's start!
As said in point 1, I have just created a basic layout as shown in the screen shot below.
You can definitely tell about the various sections that make up the page. They are the header, content, sidebar, footer. To abstract this and give power to the template designers, wordpress has placed the various sections into different pages.
In addition to this, you have to add proper CSS to your design. Include them in "style.css". Therefore, the files necessary are,
1. header.php -> Header
2. footer.php -> Footer
3. sidebar.php -> Sidebar
4. index.php -> Content glued with header, sidebar and footer.
5. style.css -> CSS
That is all you need to create a basic template. Clear? Any doubts? Post them here.
Designing the Template:
The HTML for our basic layout goes like this.
Have a look at the simple style sheet for the basic layout. Save this as "style.css". We would need it later.
Now that you have saved it, open the HTML file in a good text editor. You can see <div> sections that are tagged with "header", "footer", "sidebar" and "content". Let us create the header file.
1. Open notepad, and paste the code shown below. Save this file as "header.php".
2. Copy the fragment below and save it in a new file as "footer.php".
3. Copy the sidebar code and save it in a new file as "sidebar.php".
4. Last but not the least, let us create the "index.php". If you notice, there are special lines such as "<?php get_header(); ?>", "<?php get_footer(); ?>", "<?php get_sidebar(); ?>". These are the functions that are used to glue the content with header, sidebar and footer. Great! we are almost done... few more minutes.
5. Create a new folder and name it as "DarlingTemplate". Move all the newly created files, including the "style.css" to the folder. To test the new template, upload[:1] this folder to the <Wordpress_install_location>/wp-content/themes folder. Login to your blog and you will see the new template under the "Presentation" tab.
6. Click on our template name to activate it. Well, everything is cool. The template looks just like the simple HTML file we created earlier. But, what happened to the posts?
7. Open up "index.php", replace it with the text in the following box and save it. Make sure the modified
file is uploaded to the <Wordpress_install_location>/wp-content/themes/DarlingTemplate
folder. Refresh the blog homepage. Voila!! the posts are there.
8. Oh! we are still left with 30 seconds. Take a screen shot of your theme. Save it as "screenshot.png" and upload it to
<Wordpress_install_location>/wp-content/themes/DarlingTemplate.
Now, when you login to your wordpress account, our template will have a medium sized thumbnail picture.
We have uploaded the final sample template as a zip file for your reference. Download it here.
Happy Templating! :)
Note:
1. You cannot upload the new template if your blog is hosted at wordpress.com.
Monday, May 01, 2006
A Simple MIDP Application using Netbeans
For this application, we will use the standard emulator that ships with the netbeans mobility pack. We will create a simple application that accepts username and password. If the username is "aswin" ;) then it will take you to the next screen. Otherwise, it will display a small error box. Understood??
Ok, be a good student and fire up Netbeans 5.0.
1. Go to File-->New Project. Select "Mobile" on the left pane and "Mobile Application" on the right pane.
2. Click "Next" and give the project name as "MyGreatMobile". Click "Next".
3. Select the Emulator Platform as J2ME Wireless Toolkit 2.2. Leave the other settings as it is and select "Finish".
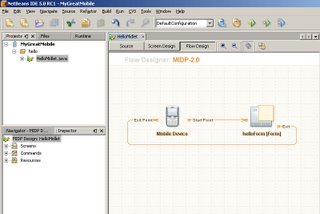
You should have something similar to the one shown below.

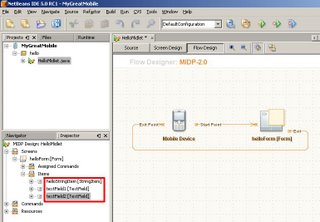
4. Choose Window-->Palette. The Palette window is now displayed. From the "Form Items" section, drag and drop 2 textfields on the "HelloForm". The whole window should look like the one shown.

5. From the "Commands" section of the Palette, drag-n-drop and "Ok Command" and a "Exit Command". Press F5 at anytime to view the output on the emulator.

6. Drag-n-drop a "List" and an "Alert" from the "Screens" section of the Palette. Link the "Ok" of "helloForm" to "list1". We will link the Alert programmatically. Also d-n-d a few listitems from the "Elements" section and a "Ok Command" onto "list1". Link the "Ok" of list1 to Form1. Check the screen shot below.

7. Double click on alert1 and change the text to "Invalid username or password".
8. Now, if you switch to the Source view from the Flow Design view, you will be able to see that all the necessary code is generated, to implement the functionality shown in the flow design. THAT IS AMAZING!
Let us switch to Source view and do some tweaking to get the functionality we want. Find the function called public void commandAction. That function implements all the necessary conditions for navigation. It initially looks like below.

Change the code so that it is similar to the next screen shot.

We are done. Press F5 to view the beauty :D


The next post will be on consuming .net web services on Java ME. Bye!!
