Hi guys, I use the MT880 Huawei router for my broadband connection. I use the connection not as a dialled one as mentioned here but as a gateway; meaning, you can just open your favourite browser and start surfing the internet.
When I use the router as a gateway, I cannot give my system IP address to my friends to test any webpage because the router acts as a proxy. The only solution for this is port redirection. Port redirection means that a request on a particular system on a particular port will be redirected to another system on another port.
I had been trying in and out to configure the "Virtual Server" section to redirect to my system but in vain. Today, I found an excellent tutorial in one of the forum threads at vinuthomas.com, explaining the steps to achieve the same. I have downloaded the tutorial and uploaded it again on my server. Download it here and enjoy configuring your MT880 router to run your own web applications.
Sunday, March 18, 2007
Thursday, February 08, 2007
sc.exe
Hi guys, due to some mess with mysql and apache and therefore unable to uninstall mysql, I looked thro' the registry to search the entry that was important enough to remove the apache and mysql services.
On the way, I discovered a tool called "sc.exe". Deleting a service has never become easier that that command :D
1. Start->Run->cmd
2. sc delete service_name - where service_name is the service to be removed.
To find the service name,
1. Start->Run->services.msc
2. Find the service. The 1st column contains the service name. Use this in the sc command.
Read more about the sc.exe command.
Bye!
Sunday, September 17, 2006
How-To: Create a wordpress template in 5 minutes
Hi, how many of you have felt the need to create a new wordpress template and felt that the structure is too intimidating? We had the same feeling too until we realised how easy it is to create a wordpress template.
A few things before you need a template are,
1. Figure out the layout of your blog. That is, you should be clear about what should be placed where. Ofcourse, it's entirely at your discretion.
2. Create a simple HTML page that show cases your layout.
3. Mould the simple page into a beautiful wordpress template.
Ready?? Ok, let's start!
As said in point 1, I have just created a basic layout as shown in the screen shot below.

You can definitely tell about the various sections that make up the page. They are the header, content, sidebar, footer. To abstract this and give power to the template designers, wordpress has placed the various sections into different pages.
In addition to this, you have to add proper CSS to your design. Include them in "style.css". Therefore, the files necessary are,
1. header.php -> Header
2. footer.php -> Footer
3. sidebar.php -> Sidebar
4. index.php -> Content glued with header, sidebar and footer.
5. style.css -> CSS
That is all you need to create a basic template. Clear? Any doubts? Post them here.
Designing the Template:
The HTML for our basic layout goes like this.
Note:
1. You cannot upload the new template if your blog is hosted at wordpress.com.
A few things before you need a template are,
1. Figure out the layout of your blog. That is, you should be clear about what should be placed where. Ofcourse, it's entirely at your discretion.
2. Create a simple HTML page that show cases your layout.
3. Mould the simple page into a beautiful wordpress template.
Ready?? Ok, let's start!
As said in point 1, I have just created a basic layout as shown in the screen shot below.
You can definitely tell about the various sections that make up the page. They are the header, content, sidebar, footer. To abstract this and give power to the template designers, wordpress has placed the various sections into different pages.
In addition to this, you have to add proper CSS to your design. Include them in "style.css". Therefore, the files necessary are,
1. header.php -> Header
2. footer.php -> Footer
3. sidebar.php -> Sidebar
4. index.php -> Content glued with header, sidebar and footer.
5. style.css -> CSS
That is all you need to create a basic template. Clear? Any doubts? Post them here.
Designing the Template:
The HTML for our basic layout goes like this.
Have a look at the simple style sheet for the basic layout. Save this as "style.css". We would need it later.
Now that you have saved it, open the HTML file in a good text editor. You can see <div> sections that are tagged with "header", "footer", "sidebar" and "content". Let us create the header file.
1. Open notepad, and paste the code shown below. Save this file as "header.php".
2. Copy the fragment below and save it in a new file as "footer.php".
3. Copy the sidebar code and save it in a new file as "sidebar.php".
4. Last but not the least, let us create the "index.php". If you notice, there are special lines such as "<?php get_header(); ?>", "<?php get_footer(); ?>", "<?php get_sidebar(); ?>". These are the functions that are used to glue the content with header, sidebar and footer. Great! we are almost done... few more minutes.
5. Create a new folder and name it as "DarlingTemplate". Move all the newly created files, including the "style.css" to the folder. To test the new template, upload[:1] this folder to the <Wordpress_install_location>/wp-content/themes folder. Login to your blog and you will see the new template under the "Presentation" tab.
6. Click on our template name to activate it. Well, everything is cool. The template looks just like the simple HTML file we created earlier. But, what happened to the posts?
7. Open up "index.php", replace it with the text in the following box and save it. Make sure the modified
file is uploaded to the <Wordpress_install_location>/wp-content/themes/DarlingTemplate
folder. Refresh the blog homepage. Voila!! the posts are there.
8. Oh! we are still left with 30 seconds. Take a screen shot of your theme. Save it as "screenshot.png" and upload it to
<Wordpress_install_location>/wp-content/themes/DarlingTemplate.
Now, when you login to your wordpress account, our template will have a medium sized thumbnail picture.
We have uploaded the final sample template as a zip file for your reference. Download it here.
Happy Templating! :)
Note:
1. You cannot upload the new template if your blog is hosted at wordpress.com.
Monday, May 01, 2006
A Simple MIDP Application using Netbeans
The last post was on setting up the Nokia S60 SDK with netbeans 5.0. The application we are going to develop now doesn't require the Nokia SDK. It is required only when you want to implement Nokia specific features. By the way, MIDP is called Mobile Information Device Profile. Two common versions of MIDP supported by most mobile phones across manufacturers are MIDP 1.0 and MIDP 2.0. MIDP on combination with CLDC - Connected Limited Device Configuration - allows us to build device independent applications. Both of them are products from Sun Microsystems. You can read more about MIDP here and CLDC here. Look at the huge list of mobile phones that support MIDP and CLDC.
For this application, we will use the standard emulator that ships with the netbeans mobility pack. We will create a simple application that accepts username and password. If the username is "aswin" ;) then it will take you to the next screen. Otherwise, it will display a small error box. Understood??
Ok, be a good student and fire up Netbeans 5.0.
1. Go to File-->New Project. Select "Mobile" on the left pane and "Mobile Application" on the right pane.
2. Click "Next" and give the project name as "MyGreatMobile". Click "Next".
3. Select the Emulator Platform as J2ME Wireless Toolkit 2.2. Leave the other settings as it is and select "Finish".
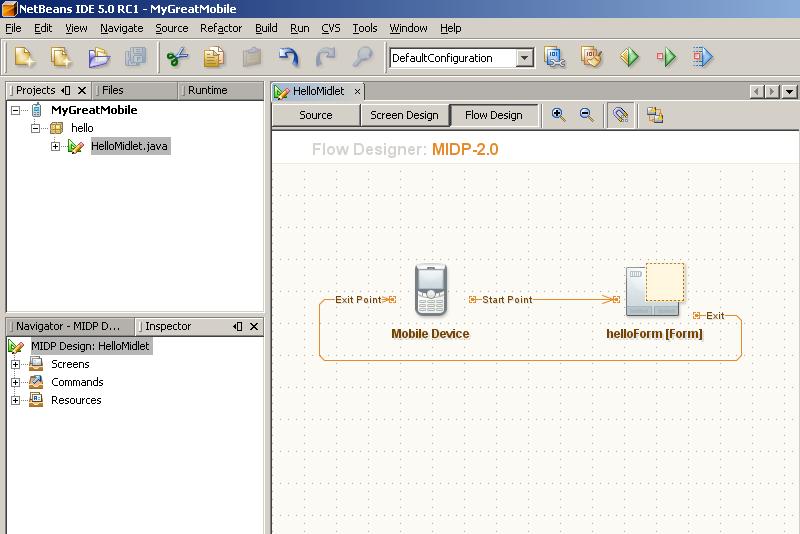
You should have something similar to the one shown below.

4. Choose Window-->Palette. The Palette window is now displayed. From the "Form Items" section, drag and drop 2 textfields on the "HelloForm". The whole window should look like the one shown.

5. From the "Commands" section of the Palette, drag-n-drop and "Ok Command" and a "Exit Command". Press F5 at anytime to view the output on the emulator.

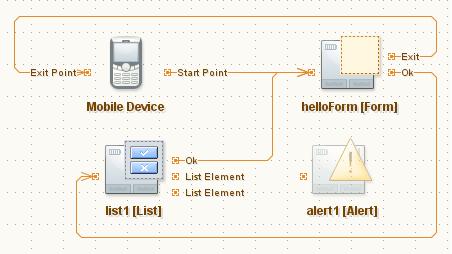
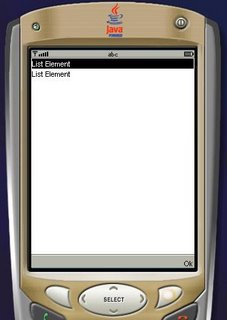
6. Drag-n-drop a "List" and an "Alert" from the "Screens" section of the Palette. Link the "Ok" of "helloForm" to "list1". We will link the Alert programmatically. Also d-n-d a few listitems from the "Elements" section and a "Ok Command" onto "list1". Link the "Ok" of list1 to Form1. Check the screen shot below.
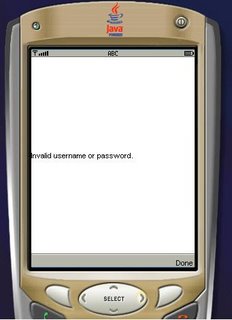
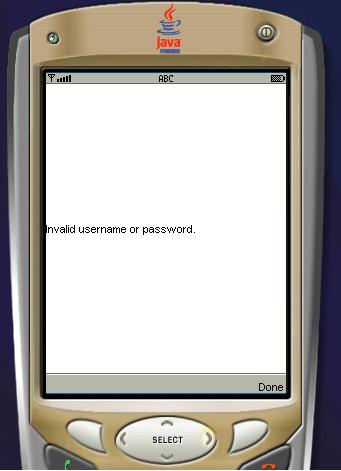
7. Double click on alert1 and change the text to "Invalid username or password".
8. Now, if you switch to the Source view from the Flow Design view, you will be able to see that all the necessary code is generated, to implement the functionality shown in the flow design. THAT IS AMAZING!
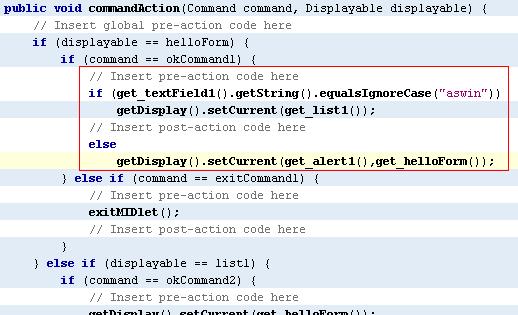
Let us switch to Source view and do some tweaking to get the functionality we want. Find the function called public void commandAction. That function implements all the necessary conditions for navigation. It initially looks like below.

Change the code so that it is similar to the next screen shot.

We are done. Press F5 to view the beauty :D


The next post will be on consuming .net web services on Java ME. Bye!!
For this application, we will use the standard emulator that ships with the netbeans mobility pack. We will create a simple application that accepts username and password. If the username is "aswin" ;) then it will take you to the next screen. Otherwise, it will display a small error box. Understood??
Ok, be a good student and fire up Netbeans 5.0.
1. Go to File-->New Project. Select "Mobile" on the left pane and "Mobile Application" on the right pane.
2. Click "Next" and give the project name as "MyGreatMobile". Click "Next".
3. Select the Emulator Platform as J2ME Wireless Toolkit 2.2. Leave the other settings as it is and select "Finish".
You should have something similar to the one shown below.
4. Choose Window-->Palette. The Palette window is now displayed. From the "Form Items" section, drag and drop 2 textfields on the "HelloForm". The whole window should look like the one shown.

5. From the "Commands" section of the Palette, drag-n-drop and "Ok Command" and a "Exit Command". Press F5 at anytime to view the output on the emulator.
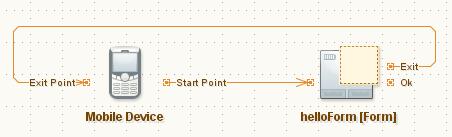
6. Drag-n-drop a "List" and an "Alert" from the "Screens" section of the Palette. Link the "Ok" of "helloForm" to "list1". We will link the Alert programmatically. Also d-n-d a few listitems from the "Elements" section and a "Ok Command" onto "list1". Link the "Ok" of list1 to Form1. Check the screen shot below.

7. Double click on alert1 and change the text to "Invalid username or password".
8. Now, if you switch to the Source view from the Flow Design view, you will be able to see that all the necessary code is generated, to implement the functionality shown in the flow design. THAT IS AMAZING!
Let us switch to Source view and do some tweaking to get the functionality we want. Find the function called public void commandAction. That function implements all the necessary conditions for navigation. It initially looks like below.

Change the code so that it is similar to the next screen shot.
We are done. Press F5 to view the beauty :D


The next post will be on consuming .net web services on Java ME. Bye!!
Thursday, April 27, 2006
Nokia S60 Emulator Integration with Netbeans 5.0
Hello guys, I just downloaded the Nokia S60 SDK for developing MIDP based applications for java mobile phones. Netbeans proved its mettle here again in terms of recognising the SDK and freeing me of all troubles. I downloaded the S60 SDK here and netbeans 5.0 here. CarbideJ is not required if you are going to develop on top of netbeans.
That said, i will tell you how to integrate the S60 SDK into netbeans.
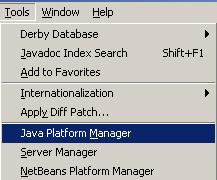
1. Goto Tools-->Platform Manager and click on the "Add Platform" button.
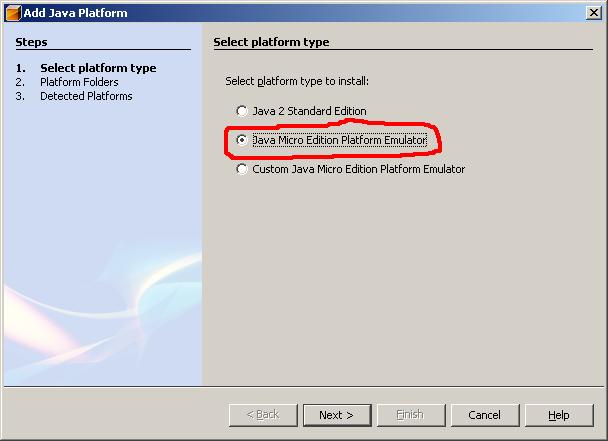
2. Select "Java Micro Edition Platform Emulator" in the new dialog box and click on "Next".

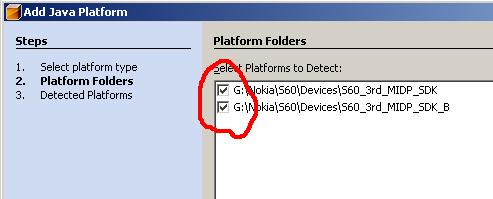
3. If the IDE is unable to locate the S60 platform folders, click on "Find More Java ME Platform Folders..." button and point it to the location where you have installed the SDK.

4. Click on Next. It will detect the installed platforms. Click on Finish and we are done. Close the Java Platform Manager.
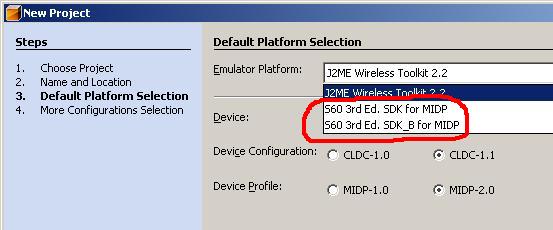
Now, go to File-->New Project. Select "Mobile" on the left pane and "Mobile Application" on the right pane. Give it a name. On the next screen click on the "Emulator Platform" combo box and you will be able to see the installed emulators.

Thats it! we are done. You are up and ready to build beautiful applications for MIDP phones in just 4 steps :)
That said, i will tell you how to integrate the S60 SDK into netbeans.
1. Goto Tools-->Platform Manager and click on the "Add Platform" button.

2. Select "Java Micro Edition Platform Emulator" in the new dialog box and click on "Next".
3. If the IDE is unable to locate the S60 platform folders, click on "Find More Java ME Platform Folders..." button and point it to the location where you have installed the SDK.
4. Click on Next. It will detect the installed platforms. Click on Finish and we are done. Close the Java Platform Manager.
Now, go to File-->New Project. Select "Mobile" on the left pane and "Mobile Application" on the right pane. Give it a name. On the next screen click on the "Emulator Platform" combo box and you will be able to see the installed emulators.
Thats it! we are done. You are up and ready to build beautiful applications for MIDP phones in just 4 steps :)
Friday, March 10, 2006
Mustang (Java SE 6.0)
Hi!!, just downloaded mustang beta. Have to try it. You can also download it here. There are a lot of cool features introduced with this. Read more about it here.
It says there are improvements in UI too; and during the Sun Tech Days, they told that support was being added for Vista UI too. Let us see how the UI displays in Vista. Will post more about the UI later in the day. By the way, i have uploaded some vista pictures from my very own installation of Windows Vista :D. See them.
Bye!
Tuesday, March 07, 2006
Two Minute Web Browser in Java
Hi! people, i have been hearing that a web browser in VB.NET takes 6 lines of code. How much lines of code do you think it would be in java??
Well, it takes just 3 lines of code. If you come back to me saying that it takes lot of pain to create the necessary GUI then "WTF, download netbeans". With matisse, netbeans provides a solid foundation for designing GUIs, so that developers like me can forget GridBagLayout and rest in peace. Ok enough of that ;)
1. Open netbeans ide.
2. Create a new project. File->New Project. Select "General" and on the right pane, choose "Java Application".
3. Click next. Give the project name as "TwoMinBrowser" and "Finish".
Your project is ready. Go to java.net and download JDIC (JDesktop Integration Components). It doesn't come as a part of Java SE 5.0 or J2SE 4.0. Good news is that, it is a part of Mustang (Java SE 6). Unpack the JDIC zip file and you will find a "jdic.jar".

Click on the Projects tab in the IDE (Window->Projects), expand TwoMinBrowser. Now expand "Libraries" section, right click on it and select "Add JAR/Folder". Navigate to the "jdic.jar" and add it. The projects tab should be like the image on the left.
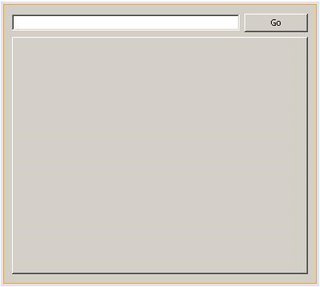
Expand "Source Packages", right click on "twominbrowser" and select "New->JFrame Form". Give it a name and click "Finish". From the Palette, drag n drop a JPanel. Resize it to fit the full form. Now add a JTextField (txtUrl), a JButton and JTabbedPane (browPane). The final form should be like the screenshot on the right. Click on the image to see a bigger one.
Double click on the JButton ("Go") or right click on it and select Events->Action->actionPerformed. Write the following code. Press Alt+Shift+F to resolve unresolved classes. Press F5. Should you get any errors, delete the Main.java from the "Source Packages" node and press F5 again. It should now compile and execute.
try
{
WebBrowser wb=new WebBrowser();
wb.setURL(new URL(txtUrl.getText()));
browPane.add(wb);
}
catch(Exception ex)
{
JOptionPane.showMessageDialog(null,ex.getMessage());
}
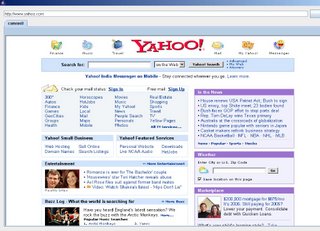
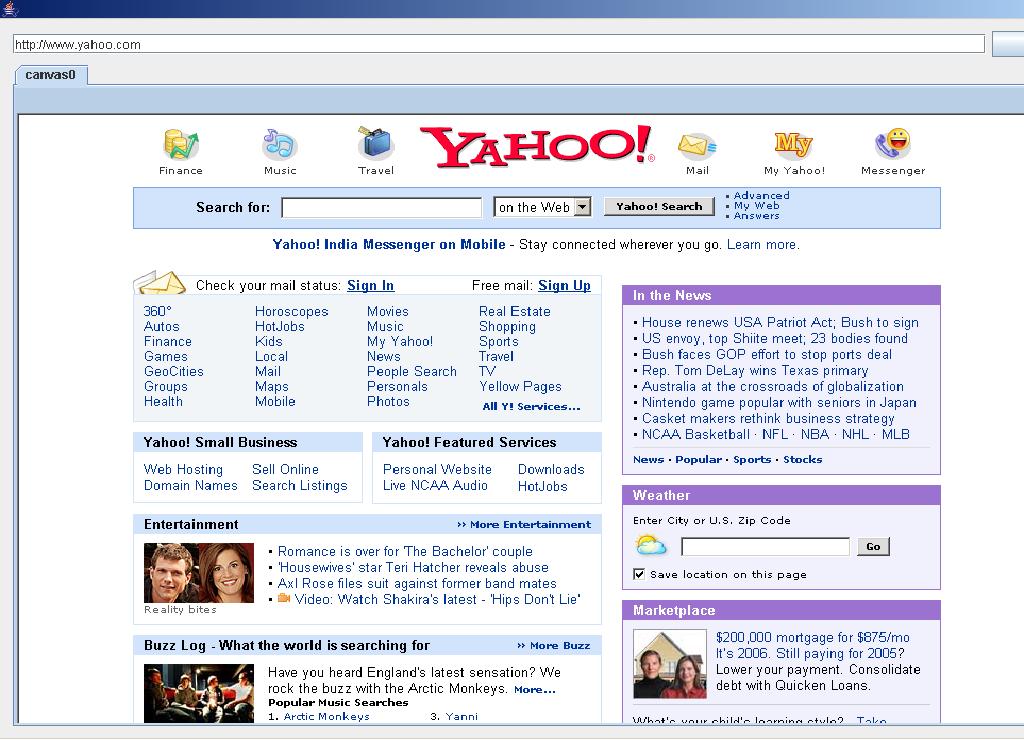
Type in a proper url at the textbox and click on "Go". Our TwoMinBrowser will work. This is the result of display of yahoo page in our browser. The same code will work in linux also.
Change the url and click on "Go" again, you should see a new tab. Thats it, ur tabbed browser is up and running in just 3 lines of code. If you are a netbeans user already, building this will take you only 2 minutes.
As i'm writing this, Netbeans 5.5 preview release is installing. It requires JDK 1.5.0_06. In case you don't have, download it here. Read about the UML features of Netbeans 5.5 here and here.
Bye!
Update: Geertjan has a cool post on porting this simple application to netbeans platform.
Well, it takes just 3 lines of code. If you come back to me saying that it takes lot of pain to create the necessary GUI then "WTF, download netbeans". With matisse, netbeans provides a solid foundation for designing GUIs, so that developers like me can forget GridBagLayout and rest in peace. Ok enough of that ;)
1. Open netbeans ide.
2. Create a new project. File->New Project. Select "General" and on the right pane, choose "Java Application".
3. Click next. Give the project name as "TwoMinBrowser" and "Finish".
Your project is ready. Go to java.net and download JDIC (JDesktop Integration Components). It doesn't come as a part of Java SE 5.0 or J2SE 4.0. Good news is that, it is a part of Mustang (Java SE 6). Unpack the JDIC zip file and you will find a "jdic.jar".
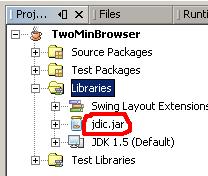
Click on the Projects tab in the IDE (Window->Projects), expand TwoMinBrowser. Now expand "Libraries" section, right click on it and select "Add JAR/Folder". Navigate to the "jdic.jar" and add it. The projects tab should be like the image on the left.
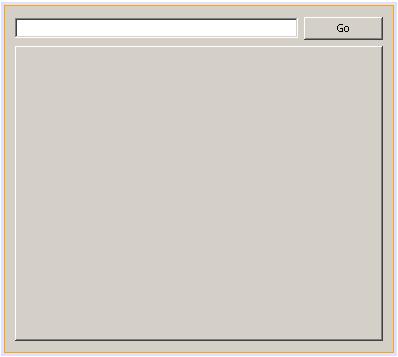
Expand "Source Packages", right click on "twominbrowser" and select "New->JFrame Form". Give it a name and click "Finish". From the Palette, drag n drop a JPanel. Resize it to fit the full form. Now add a JTextField (txtUrl), a JButton and JTabbedPane (browPane). The final form should be like the screenshot on the right. Click on the image to see a bigger one.
Double click on the JButton ("Go") or right click on it and select Events->Action->actionPerformed. Write the following code. Press Alt+Shift+F to resolve unresolved classes. Press F5. Should you get any errors, delete the Main.java from the "Source Packages" node and press F5 again. It should now compile and execute.
try
{
WebBrowser wb=new WebBrowser();
wb.setURL(new URL(txtUrl.getText()));
browPane.add(wb);
}
catch(Exception ex)
{
JOptionPane.showMessageDialog(null,ex.getMessage());
}
Type in a proper url at the textbox and click on "Go". Our TwoMinBrowser will work. This is the result of display of yahoo page in our browser. The same code will work in linux also.
Change the url and click on "Go" again, you should see a new tab. Thats it, ur tabbed browser is up and running in just 3 lines of code. If you are a netbeans user already, building this will take you only 2 minutes.
As i'm writing this, Netbeans 5.5 preview release is installing. It requires JDK 1.5.0_06. In case you don't have, download it here. Read about the UML features of Netbeans 5.5 here and here.
Bye!
Update: Geertjan has a cool post on porting this simple application to netbeans platform.
Friday, February 24, 2006
Consuming a Java Webservice in .Net
hi!! guys, yesterday i developed a simple "Hello World!" webservice with java. With Netbeans 5.0 IDE its a breeze to create web services. It comes bundled with Apache Tomcat 5.5.9 and Sun Java Application Server 8.2.
You can find the quickstart tutorial here to develop web services. Just follow that tute and you will be fine. I will tell you how to consume the same using .net. I used Visual Studio 2005 to consume this service. I assume that you have the url for the wsdl of the webservice which should be similar to, http://localhost:8080/WebApplication1/NewWebService?WSDL.
1. Open Visual studio. "File->New->Website". If using VS2003 then, "File->New->Project->ASP.NET Web Application".
2. A web application should have been created by now and you have the "design view" of "default.aspx" or any other aspx page of your choice.
3. Press Ctrl+Alt+L or View->Solution Explorer. Right click on your project name and select "Add Web Reference". In the windows that pops up, give the WSDL url and an "Instance Name". My instance name was "JavaAdd".
4. Add a button and a label to the asp.net page. Double click the button and paste the following code.
VB.NET
Dim js As New JavaAdd.NewWebService()
Dim myadd As New JavaAdd.add()
Dim myaddRes As New JavaAdd.addResponse()
myadd.int_1 = 10
myadd.int_2 = 10
myaddRes = js.add(myadd)
Label1.Text = myaddRes.result
C#
JavaAdd.NewWebService js = new JavaAdd.NewWebService();
JavaAdd.add myadd = new JavaAdd.add();
JavaAdd.addResponse myaddRes=new JavaAdd.addResponse(); myadd.int_1=10;
myadd.int_2=10;
myaddRes=js.add(myadd); Label1.Text=Convert.ToString(myaddRes.result);
Instead of "sayHi" method in the quickstart tute, i created a method called "add" which accepts 2 integer parameters and returns an integer after adding them up.
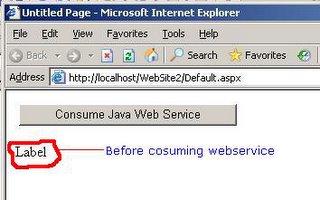
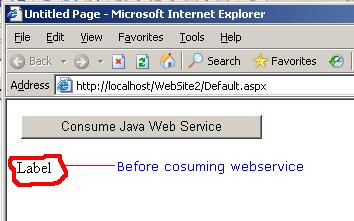
5. Press F5 now. You should get something similar to these.

Thats it for this post...bye!
You can find the quickstart tutorial here to develop web services. Just follow that tute and you will be fine. I will tell you how to consume the same using .net. I used Visual Studio 2005 to consume this service. I assume that you have the url for the wsdl of the webservice which should be similar to, http://localhost:8080/WebApplication1/NewWebService?WSDL.
1. Open Visual studio. "File->New->Website". If using VS2003 then, "File->New->Project->ASP.NET Web Application".
2. A web application should have been created by now and you have the "design view" of "default.aspx" or any other aspx page of your choice.
3. Press Ctrl+Alt+L or View->Solution Explorer. Right click on your project name and select "Add Web Reference". In the windows that pops up, give the WSDL url and an "Instance Name". My instance name was "JavaAdd".
4. Add a button and a label to the asp.net page. Double click the button and paste the following code.
VB.NET
Dim js As New JavaAdd.NewWebService()
Dim myadd As New JavaAdd.add()
Dim myaddRes As New JavaAdd.addResponse()
myadd.int_1 = 10
myadd.int_2 = 10
myaddRes = js.add(myadd)
Label1.Text = myaddRes.result
C#
JavaAdd.NewWebService js = new JavaAdd.NewWebService();
JavaAdd.add myadd = new JavaAdd.add();
JavaAdd.addResponse myaddRes=new JavaAdd.addResponse(); myadd.int_1=10;
myadd.int_2=10;
myaddRes=js.add(myadd); Label1.Text=Convert.ToString(myaddRes.result);
Instead of "sayHi" method in the quickstart tute, i created a method called "add" which accepts 2 integer parameters and returns an integer after adding them up.
5. Press F5 now. You should get something similar to these.

Thats it for this post...bye!
Thursday, January 12, 2006
Linux from Scratch
hi!!, came across this site called Linux from Scratch, that teaches you to build your own, customised linux from the source code. The site is very interesting and would be very useful for adventerous guys (he he).
Also check the linux documentation project. The site has also documented the linux kernel.
Also check the linux documentation project. The site has also documented the linux kernel.
Thursday, December 22, 2005
LINQ Framework
LINQ or Language INtegrated Query is a set of classes in .NET that allows you to query arrays just as would query a database, using keywords such as 'select', 'where' etc.
Sounds interesting?? I'm just exploring it. Have a look at these sites in that order.
1. http://blogs.msdn.com/danielfe/archive/2005/09/13/464904.aspx
2. http://blogs.msdn.com/sriram/archive/2005/09/16/468927.aspx
There is also a video at channel9...Do check it out...http://channel9.msdn.com/showpost.aspx?postid=114680 and here is the related MSDN link that offers a lot of code samples and downloads.
By the way, it is supposed to be shipped with the next version of Visual Studio (Orcas).
Monday, December 05, 2005
Insecure SMTP...
hi!!
You may be knowing about SMTP. Its called Simple Mail Transfer Protocol. SMTP is responsible for transfering mails from 1 server to another server. Suppose you want to send a mail from yahoo mail to gmail, the yahoo server sends the mail to the google server through SMTP. To know in detail about the SMTP sepcification, refer RFC 2821 at ietf.org.
Coming back, when a mail is about to be sent, a domain called the "Mail Exchanger (MX)" is contacted, which relays the mail to the destination. The mail exchanger works on default smtp port (25). This MX can be contacted directly by bypassing the usual web interface (that we are used to) and thus anonymous mails can be sent!!! Sounds dangerous?? Read on....
For example, lets take a fictitious website called http://www.abcdefghij.com/ and lets assume its having a MX. In linux OS, we use the dig (i don't know the windows equivalent) command to retrieve the MX record of a website. On issuing the command at the terminal,
dig abcdefghij.com mx
a list of url's popup as the result. Look for ";; ANSWER SECTION". At the end of the line, there will be a url which is the mail exchanger. Ofcourse, a website may have many MX records.
Now, we have to connect using telnet to port 25, the standard SMTP port at any of the MXs.
telnet mx1.abcdefghij.com 25
Your output should look similar to
Connected to mx1.abcdefghij.com
Escape character is '^]'.
220
For each line of command you type, you will get a response. Normally, an email will have a from address, to address, subject, content. Issue the next command as follows.
MAIL FROM:<xyz@abcdefghij.com>
503 // Server output
RCPT TO:<abc@abcdefghij.com>// The angular brackets are mandatory
503
DATA
503
Subject: this is subject // A blank line is a must after this line
this is the content
. // '.' (dot) signifies content end
QUIT
221 mx1.abcdefghij.com
Connection closed by foreign host
Your mail will be sent now. Almost no servers will support foreign relaying. That is, if u want to use the MX of yahoo the 'MAIL FROM' should have its email address ending in yahoo.com or something that the yahoo servers support. The 'RCPT TO' can be any valid email address. Have a look at this url http://www.yuki-onna.co.uk/email/smtp.html for having a detailed explanation on sending mails using SMTP & terminal
Why this is insecure??
It allows emails to be sent without logging in. Only the domain of FROM address is checked to see whether its legal for relaying. That too, the email address is not verified. Therefore, unscrupulous spamming is a possibility. Connecting on normal SMTP offers a bit of security because, the email address is verified for its existence.
Hope this helped a bit.....bye!!~~
You may be knowing about SMTP. Its called Simple Mail Transfer Protocol. SMTP is responsible for transfering mails from 1 server to another server. Suppose you want to send a mail from yahoo mail to gmail, the yahoo server sends the mail to the google server through SMTP. To know in detail about the SMTP sepcification, refer RFC 2821 at ietf.org.
Coming back, when a mail is about to be sent, a domain called the "Mail Exchanger (MX)" is contacted, which relays the mail to the destination. The mail exchanger works on default smtp port (25). This MX can be contacted directly by bypassing the usual web interface (that we are used to) and thus anonymous mails can be sent!!! Sounds dangerous?? Read on....
For example, lets take a fictitious website called http://www.abcdefghij.com/ and lets assume its having a MX. In linux OS, we use the dig (i don't know the windows equivalent) command to retrieve the MX record of a website. On issuing the command at the terminal,
dig abcdefghij.com mx
a list of url's popup as the result. Look for ";; ANSWER SECTION". At the end of the line, there will be a url which is the mail exchanger. Ofcourse, a website may have many MX records.
Now, we have to connect using telnet to port 25, the standard SMTP port at any of the MXs.
telnet mx1.abcdefghij.com 25
Your output should look similar to
Connected to mx1.abcdefghij.com
Escape character is '^]'.
220
For each line of command you type, you will get a response. Normally, an email will have a from address, to address, subject, content. Issue the next command as follows.
MAIL FROM:<xyz@abcdefghij.com>
503 // Server output
RCPT TO:<abc@abcdefghij.com>
503
DATA
503
Subject: this is subject // A blank line is a must after this line
this is the content
. // '.' (dot) signifies content end
QUIT
221 mx1.abcdefghij.com
Connection closed by foreign host
Your mail will be sent now. Almost no servers will support foreign relaying. That is, if u want to use the MX of yahoo the 'MAIL FROM' should have its email address ending in yahoo.com or something that the yahoo servers support. The 'RCPT TO' can be any valid email address. Have a look at this url http://www.yuki-onna.co.uk/email/smtp.html for having a detailed explanation on sending mails using SMTP & terminal
Why this is insecure??
It allows emails to be sent without logging in. Only the domain of FROM address is checked to see whether its legal for relaying. That too, the email address is not verified. Therefore, unscrupulous spamming is a possibility. Connecting on normal SMTP offers a bit of security because, the email address is verified for its existence.
Hope this helped a bit.....bye!!~~
Monday, November 28, 2005
AJAX
hi!!
AJAX or Asynchronous Javascript & XML seems to be the coolest or hottest (in whichever way u want) technology around. It deals with sending asynchronous requests to the server behind the scenes, and its a very good way of showing interactive content.
It comes with lot of advantages. One of them being; large data driven websites need not refresh whole pages of data always to display new content. Gmail is 1 of the many sites that uses AJAX heavily.
In .net, AJAX is implemented as "Atlas" and in J2EE, any app server that supports servlets will support AJAX.
To know more about it, follow the wikipedia link. Check out the Atlas link to know more about it in .net. As for J2EE, read this excellent article on implementing AJAX. As usual, there are some FAQs as well and some common pitfalls that you should avoid.
Happy coding bye!!~~
Sunday, November 27, 2005
Yay!! New Tech Blog
hey guyz n galz, this is my tech blog.....plz return here. i will be updating this often. Meanwhile, chk out my non-tech blog.
bye!!~~
bye!!~~
Subscribe to:
Posts (Atom)